20,1K

Hello everyone!
I hope you are ready for some flamenco today as this will be the first part of a long challenge for me. Do I need to remind you that I decided to make myself a flamenco dress? If you need a little trip on memory lane, you can find my inspiration in the last post.
This project will be done during my week-ends so here is what I did on Saturday: pattern making!
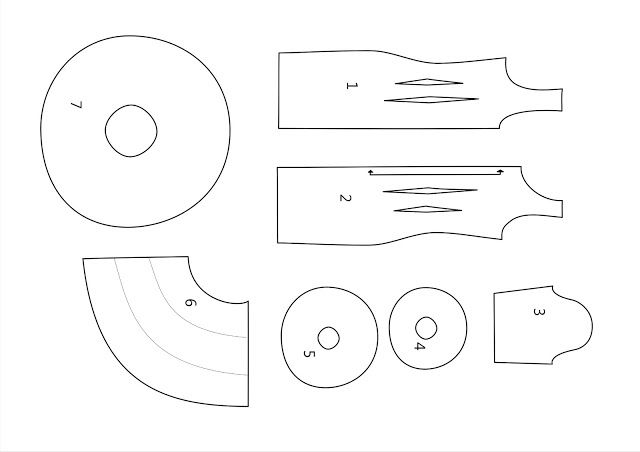
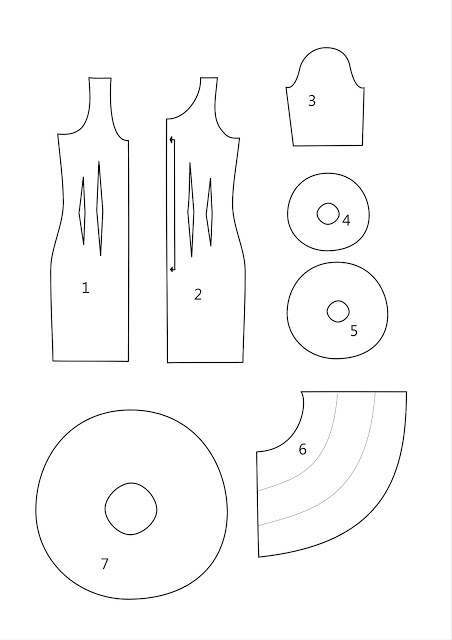
About the pattern pieces:
(First, I would suggest you to use a fitted dress pattern with princess seams and possibly with sleeves that fits you perfectly. If you feel really confident in your pattern making skills, then why not draw the whole dress, but that’s a lot more difficult. Personally, I am using Butterick 6582, a fitted dress pattern with darts that I tested before and that fits great. See the modifications in the following list).
1- back dress (cut 2). Modifications from the original pattern: I lowered the neckline and redrew the armhole to allow space for the sleeve to be sewn in.
2- front dress (cut 1 on fold). Modifications from the original pattern: I raised the neckline and eliminate the gathers on the shoulder. This means the front also had to be reshaped slightly in order to avoid the neckline to gap from excess of fabric. The armhole was redrawn as well.
3- sleeve (cut 2). I used a Burda sleeve as a model and cut it above the elbow. It is a very basic sleeve pattern I often use. Be careful, it has to be quite fitted!
4- top sleeve ruffle (cut 2). Now the fun part: please take your calculator out and be ready to scratch your head.
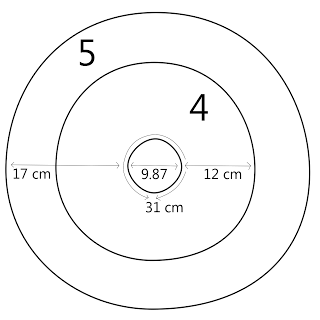
I measured the width of the sleeve (mine: 31 cm) and divided by 3.14 to know the diameter of the inside circle of the ruffle (9.87 cm). Then you decide what length you want your ruffle to be, measure the distance from the circle you just made and draw the outside circle (mine’s 12 cm long).
5- bottom sleeve ruffle (cut 2). The inside diameter is the same as the top ruffle, but the length is increased (mine is 17 cm). Does that make sense? Let me show you some diagram I made:
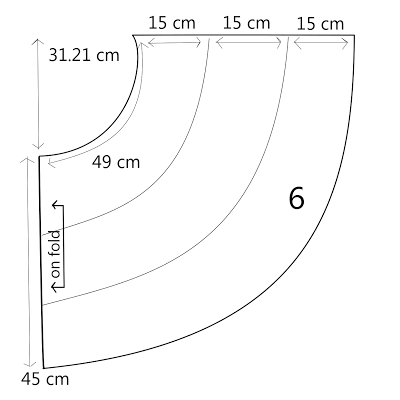
6- skirt (cut 1 on fold). The skirt pattern is a half-circle, so you only need to draw 1/4 and place it on fold. I measured the dress bottom (where you will join the dress and the skirt parts) and obtained 49 cm (front + back – seam allowances). I need to multiply that amount by 4 to obtain the circumference of the inner circle to draw: 49 x 4 = 196 cm.
And then to find the radius: (196 / 3.14) / 2 = 31.21 cm.
Then you can decide the length of the skirt (for example, 45 cm) and then where you are going to sew your ruffles. Here is the diagram:
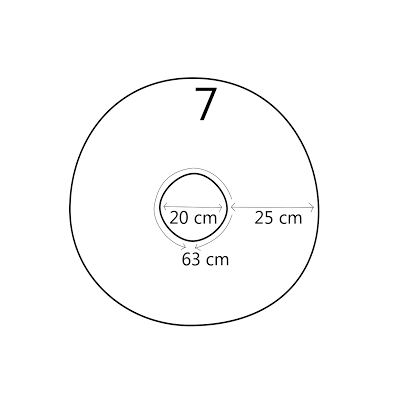
7- ruffles (cut 8). I want my ruffles to be 25 cm long. In order to know how many circles you would need, I measured the length of the ruffle lines on the skirt and multiplied it by 2, which gave me:
- 1rst ruffle: 49 x 2 = 98 cm
- 2nd ruffle: 80 x 2 = 160 cm
- 3rd ruffle: 108 x 2 = 216 cm
Then, I chose a 20 cm diameter for the inner circle of the ruffle, which gave me a 63 cm circumference. If you are going to make the ruffles in only one fabric, add the three measurements you had and divide it by 63 to know how many ruffle you are going to need:
(98 + 160 + 216) / 63 = 7.52 ——- 8 ruffles.
If, like me, you are planning on using contrasting fabric, then prepare yourself for more mathematics.
- 1rst ruffle is blue: 98 / 63 = 1.55 ——- 2 ruffles.
- 2nd and 3rd ruffles are white: (160 + 216) / 63 = 5.96 ——- 6 ruffles.
And finally, let me show you the pattern placement I used. Remember that I am using contrasting fabric so I need a little bit more fabric. I have 3 x 1,5 meters of blue with white polka dots fabric and the exact same amount of white with blue polka dots fabric. Fold your fabric in two right sides together, matching the selvedges. Here is how I placed my pattern pieces:
Next week end, I will be cutting all my pieces and hopefully start on the bodice. I hope that was useful and that it made sense. If you have an question, feel free to ask. Have a nice week.


